A-Z: Sending Inventory to Manifest
Last updated: November 11, 2026
This guide walks you through everything that happens between your factory floor and our warehouse: preparing your products, creating your Shipping Plan, packing your PO and booking your dock appointment. Following each step helps us receive your inventory faster, keeps you within our standard SLAs and avoids non-compliance fees.
There are four parts, in this order:
Prepare your products
Create your Shipping Plan
Pack your PO
Book your dock appointment
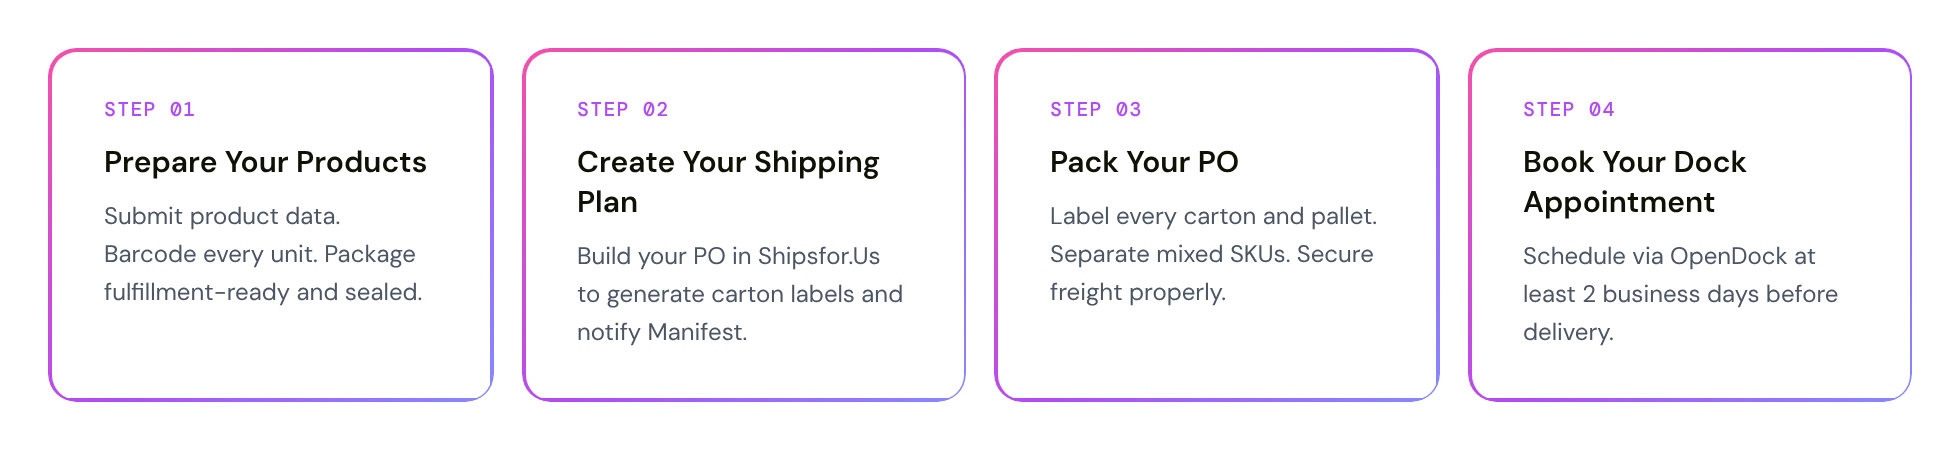
Skipping a step can cost you. Shipments that miss any of these steps may be charged non-compliance fees, take longer to receive, or be moved to our Unidentified Receiving Order (URO) process.
Who does what
You (the merchant): send product data, barcode and package every unit, create the Shipping Plan, pack and label cartons and pallets, and book the dock appointment (or have your freight forwarder book it).
Your Account Manager: receives your product data and lot or expiration details, and answers questions before you ship.
Manifest's receiving team: receives your shipment against the Shipping Plan and puts it away.
When to use this guide
You're sending inventory to Manifest for the first time.
You're sending new SKUs we haven't received before.
You want a single checklist to run through before every inbound shipment.
Before you start
You have access to the ShipHero portal at shipsfor.us.
Your products exist in ShipHero.
You have an OpenDock account, or know who will book the appointment for you. See How to Schedule an Inbound Dock Appointment Through OpenDock to set one up.
1. Prepare your products
Send us your product data first
Accurate product data drives storage, billing, label costs, carrier rate selection, packaging and picking. When new SKUs arrive without it, we measure each SKU through FAI (First Article Inspection), which is billed per SKU.
To skip the FAI fee, send your Account Manager a CSV with these fields for each new SKU before your shipment arrives:
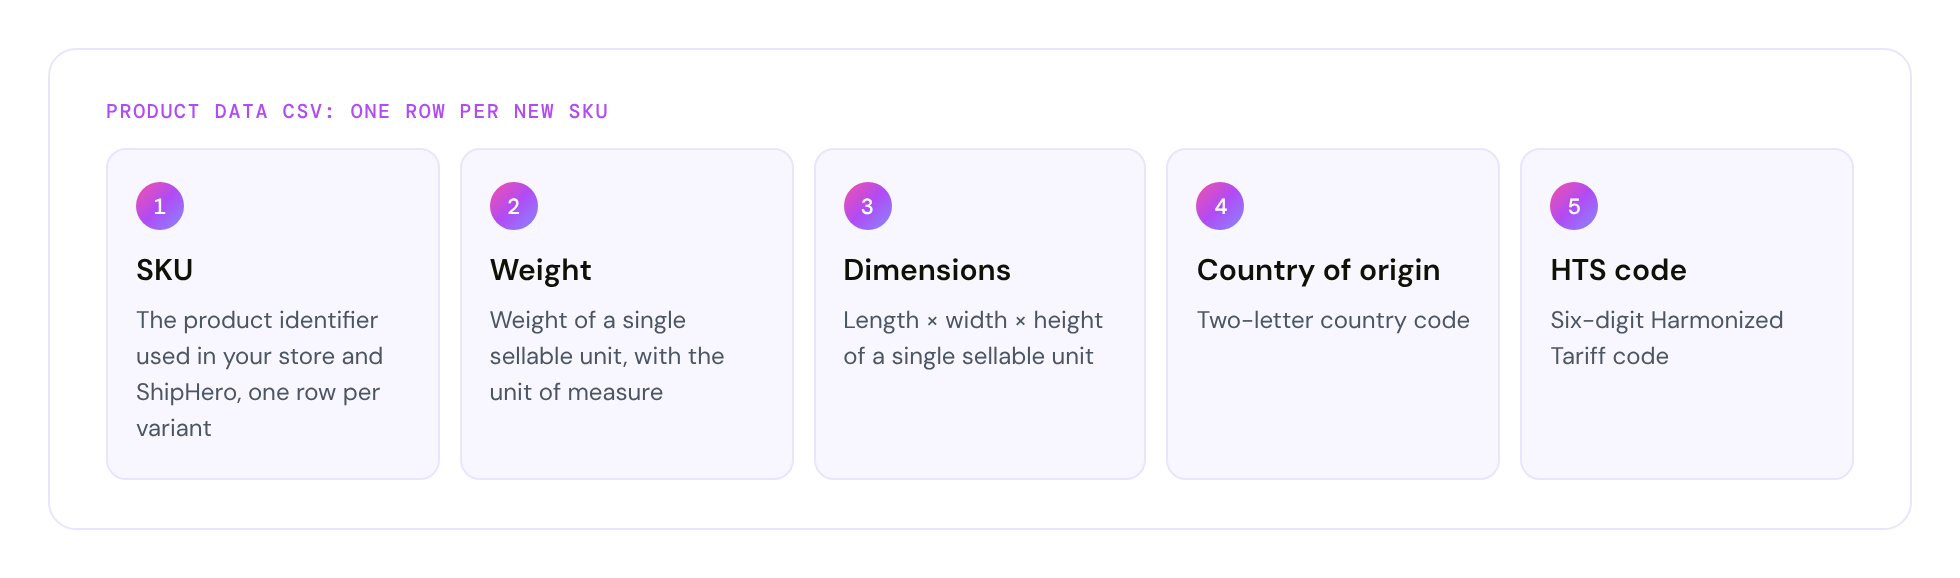
Accuracy is your responsibility. If the data you send is inaccurate and leads to incorrect storage, dimensional charges or label surcharges, those charges are billed to you. Check every weight and dimension before you send it.
FAI charges appear on your monthly invoice under the FAI tab. See Manifest Invoices - Client Detail Excel File.
Barcode every unit
Every sellable unit needs a scannable barcode, and each SKU needs its own unique barcode value. Units without a barcode are delayed or moved to URO. Once a barcode is assigned to a product in ShipHero, it can't be changed.
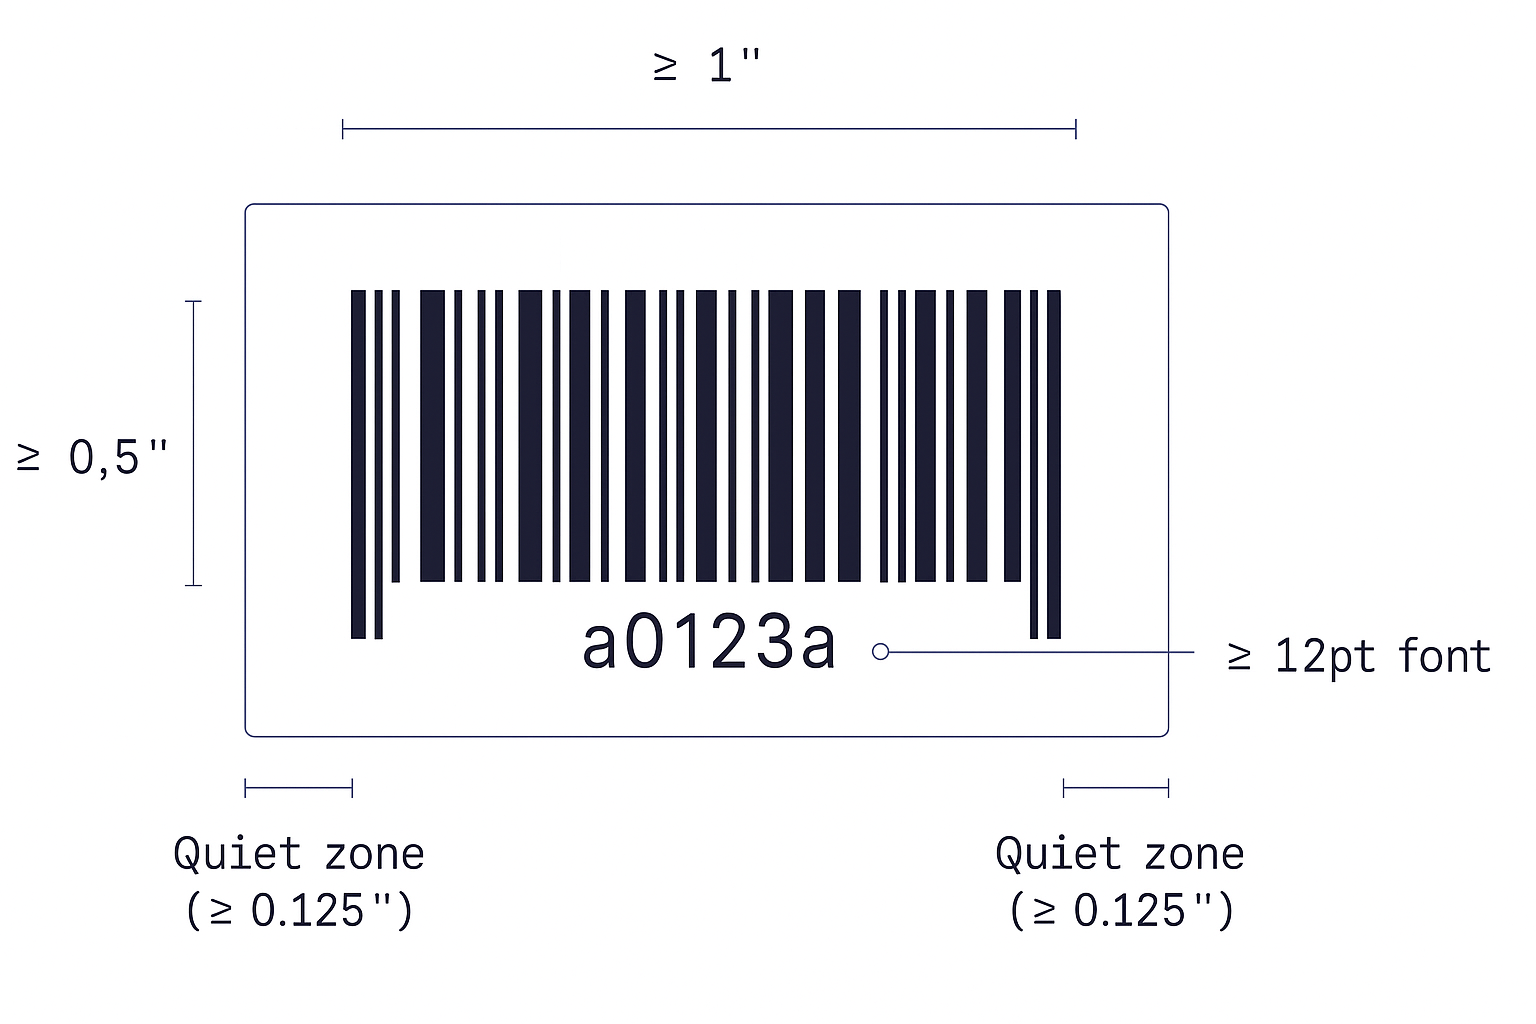
Print in black ink on white, non-reflective labels.
Make the barcode at least 1″ wide × 0.5″ tall, with a blank margin (quiet zone) of at least 0.125″ on every side and 12 pt text below.
Cover any other barcodes on the packaging that aren't in our system.
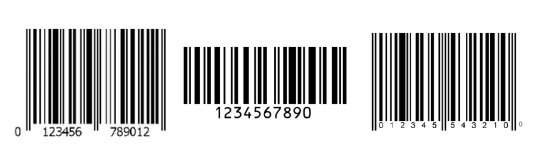
We accept two kinds of barcode:
Shopping Cart barcode: a custom alphanumeric code of up to 20 characters, in Code 128.
Manufacturer barcode: UPC (GTIN-12), EAN (GTIN-13), ISBN or GTIN-14.
Your physical units must match how you sell them. If you sell single units but they arrive shrink-wrapped in 5-packs, each single needs its own barcode and should arrive as a single. Mismatches need a special receiving setup, so talk to your Account Manager first.
For full barcode placement and print-size rules, see Barcoding Your Products.
Package every unit to survive the trip
Each unit must be individually packaged, sealed and fulfillment-ready, with no exposed raw product or open bags.
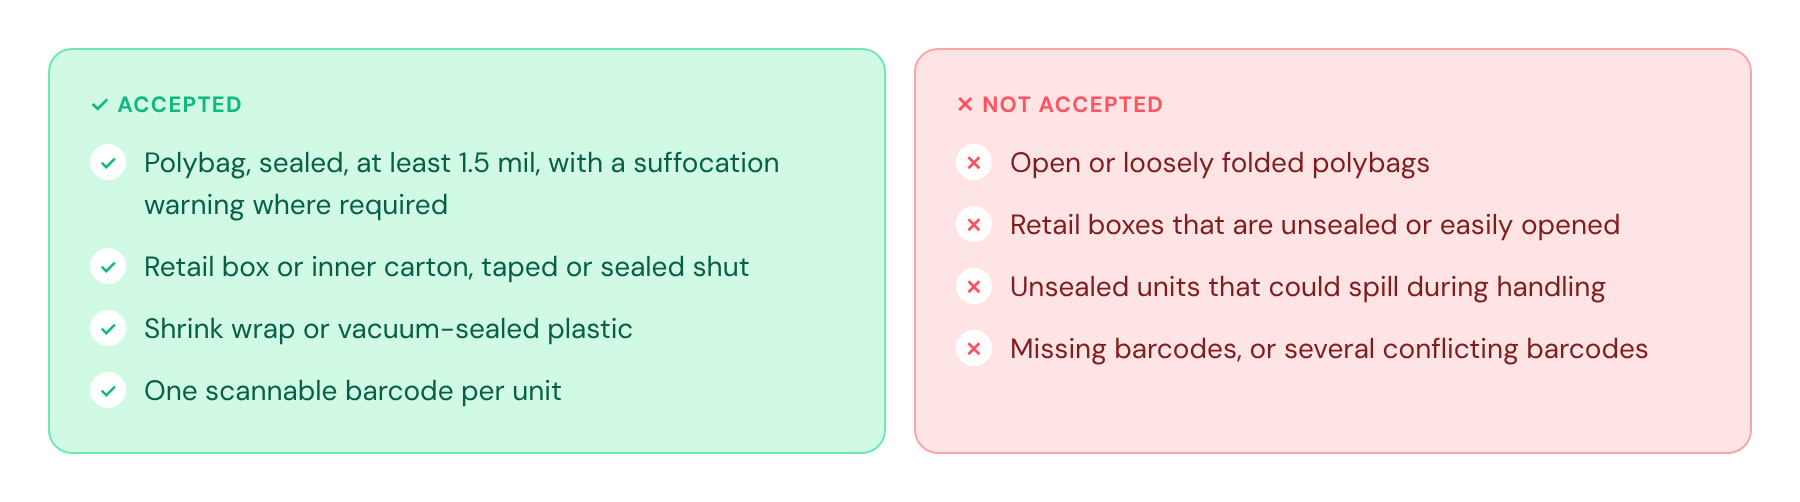
Drop test before you ship. Drop a packaged unit from 3 feet (0.9 m) onto a hard surface, once on each of its 6 sides. The product and packaging should come through fully intact.
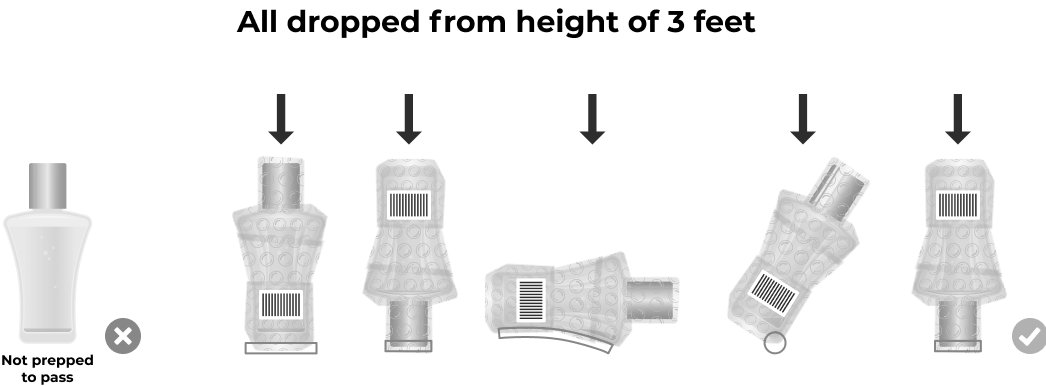
Units in non-compliant packaging may be charged a repackaging fee or held until it's resolved. See Product Packaging Requirements for the full standard.
2. Create your Shipping Plan
Your Shipping Plan (inbound PO) must be live in the ShipHero portal before anything leaves your warehouse. It creates the PO we receive against, lets us reserve storage space before you arrive, and generates the carton labels that let us receive by carton instead of counting units.
For large or multi-SKU shipments, upload a Box Manifest. A Box Manifest lists each box you're sending, by box number, with the SKUs and quantities inside it.
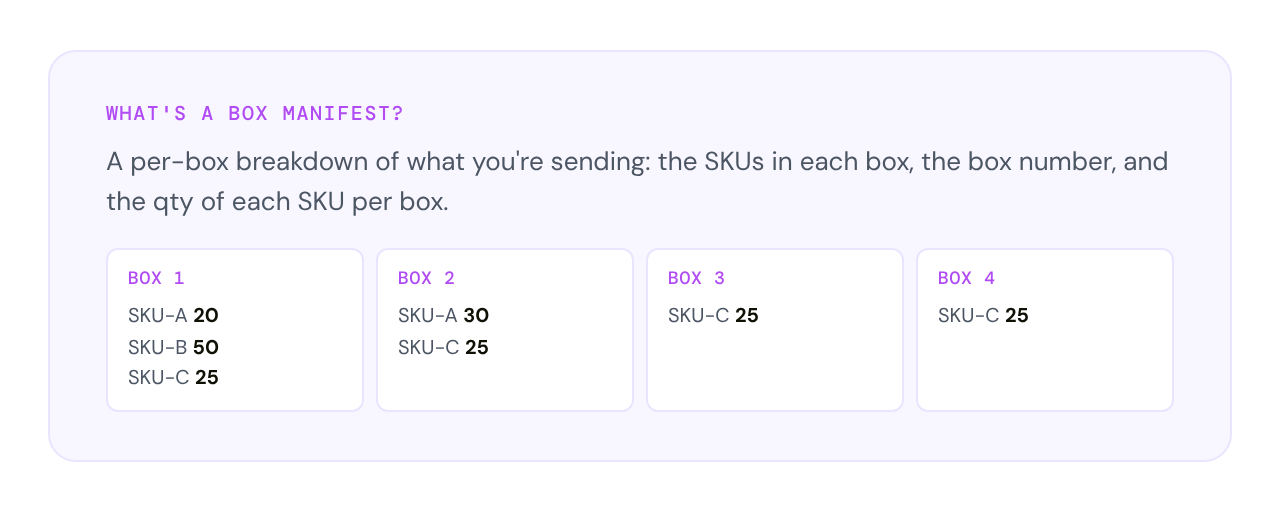
In the ShipHero portal, click Shipping plans, then Upload box manifest.
Download the template and fill in your SKUs, box numbers and quantities. Save it as a CSV; Excel files aren't accepted.
Select the warehouse and your vendor, attach the CSV and click Save.
Open the Shipping Plan and wait for its status to change from Processing, then click Print next to Shipping plan details to download your labels.
Your labels set themselves up from the Shipping Plan's packing setup, mark Parcel Mixed on any box with more than one SKU, and let us receive each carton with a single scan.
To build a Shipping Plan step by step instead, or for palletized freight with Upload pallet manifest, see How to Create an Inbound PO (Shipping Plan) in ShipHero.
Freight shipments
Create one PO per physical delivery.
Enter the PRO number or BOL number as the tracking number.
If every pallet holds a single SKU, you can enter one "box" per pallet instead of counting every carton. This doesn't apply if any pallet or carton has mixed SKUs.
A Parcel Shipping Plan holds up to 200 boxes, so split larger shipments into several plans. If you're sending pallets, print your pallet tags before you ship.
Shipping Plans can't be edited once they're created. While a plan is still saved as a Draft, you can come back and change it. After it's created, cancel it and create a new one if anything changes.
3. Pack your PO
Label every carton
A clear, complete label lets us receive your carton with one scan instead of a manual unit count, which is slower and billed.
Stick the entire label flat on the outside of the carton. Don't cut, tear or remove any part of it, and keep it off corners and seams.
Give every carton its own unique label from your Shipping Plan.
Mark Parcel Mixed: Yes on any carton holding more than one SKU.
Mark PARTIAL clearly on any case that isn't full.
If you track lots or expiration dates, show the lot number and expiration date on the outside of the case.
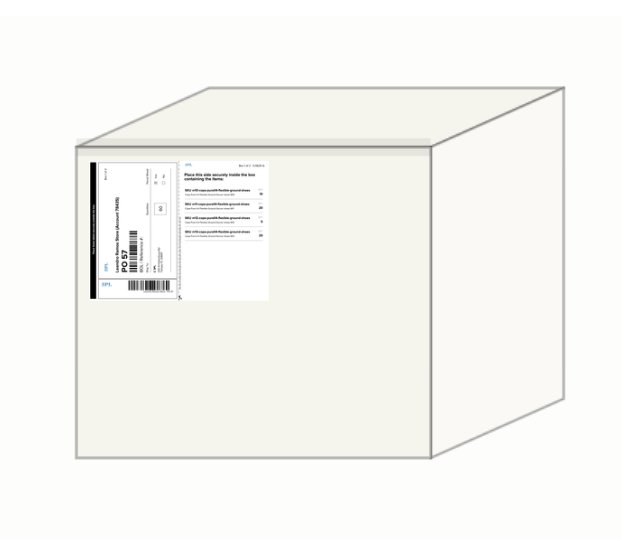
If you'd rather make your own carton labels, get approval from Manifest first by contacting your Account Manager before you ship. Approved labels must show the PO number, SKUs and quantities.
Keep mixed SKUs separated
One SKU per carton is fastest to receive. When a carton has to hold more than one SKU, separate them in one of three ways so our team can verify and put away each SKU without sorting by hand:
Dividers: a cardboard wall separates each SKU section inside the master case.
Polybags or banding: each SKU group is bagged, banded or boxed together before going into the master case.
Partitions: grid inserts divide the carton into cells, one SKU per cell, with every cell clearly identified.
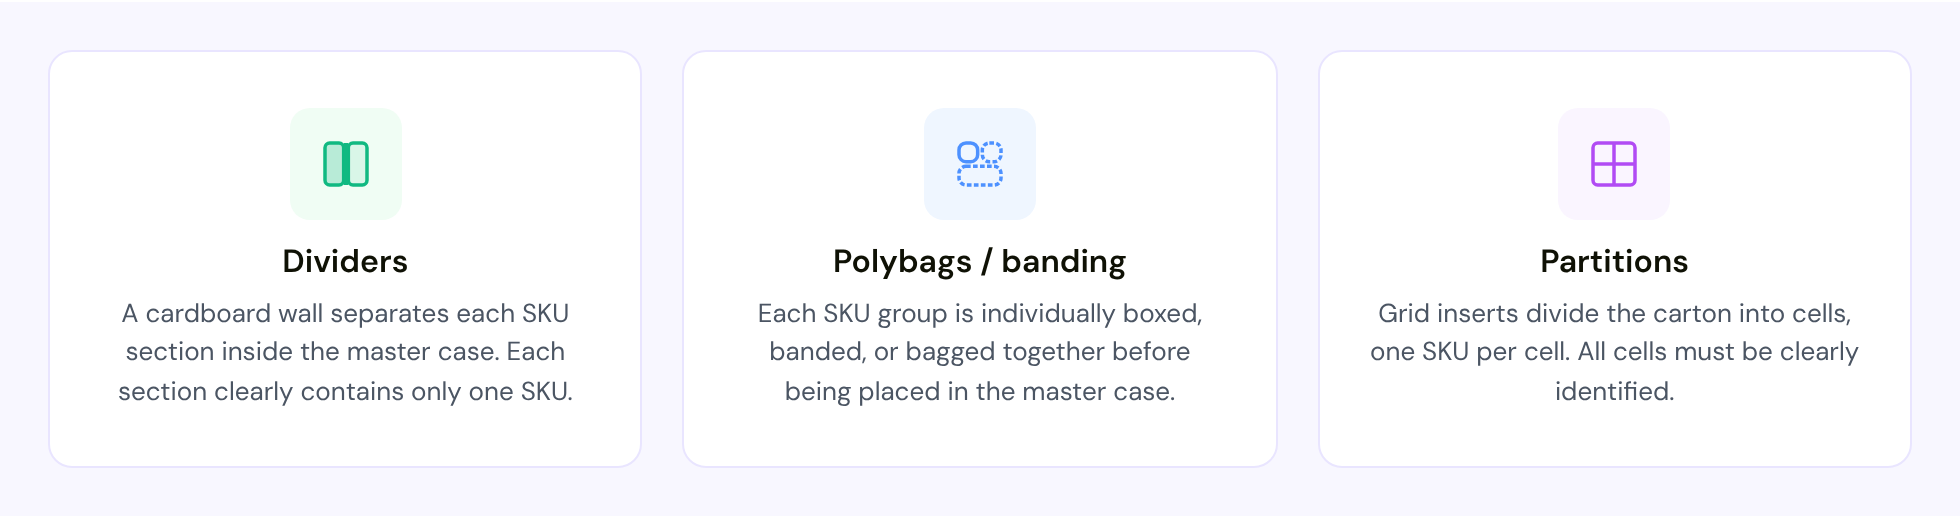
Mixed cartons separated this way aren't charged anything extra at receiving. Mixed cartons that aren't separated are charged hourly labor for sorting.
Build compliant pallets
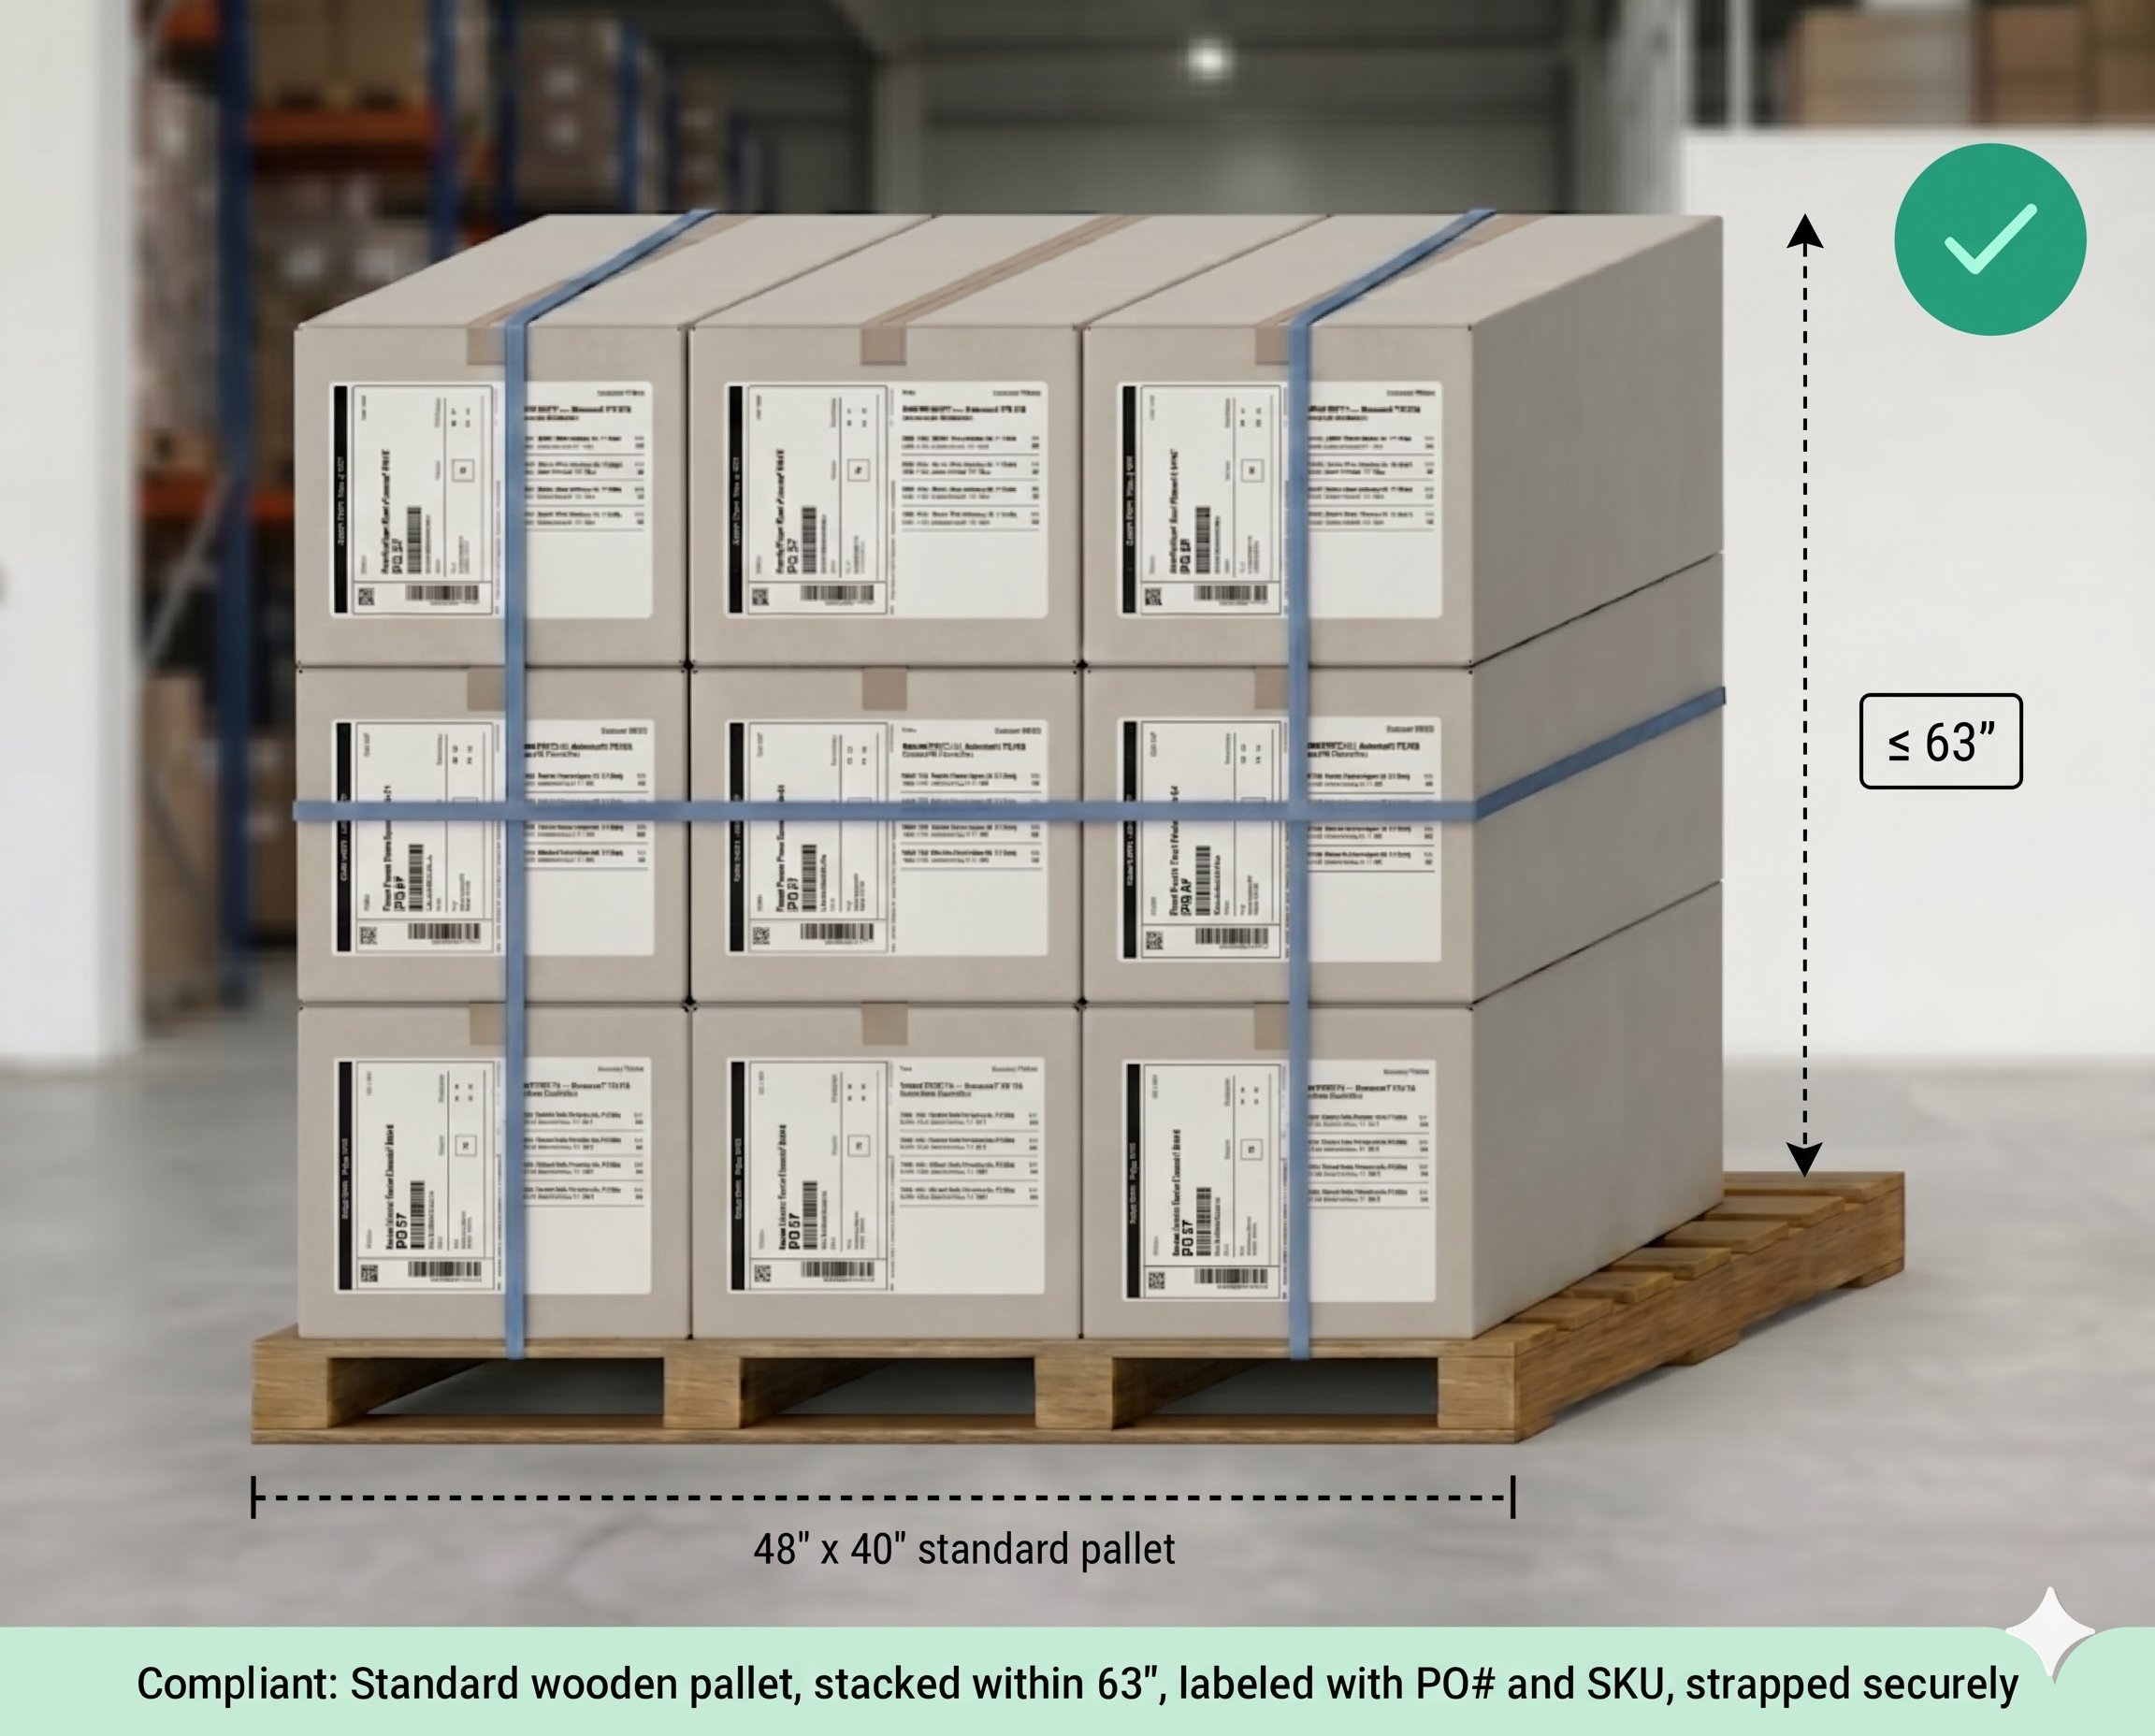
Standard pallets fit our dock equipment, forklifts and racking. Anything else has to be handled and restacked by hand.
Use standard 48″ × 40″ wooden pallets only. No plastic pallets, and no plywood pallets without cross beams.
Stack no higher than 63″ and keep everything within the pallet's footprint. The height limit matches the clearance of our racking.
Label each pallet with the PO number and whether it's single SKU or mixed SKU.
If you track lots, mark whether the pallet is single lot or mixed lot.
Strap heavy or tall pallets so they can't tip in transit.
Pallets larger than 48″ × 40″ × 63″ are down-stacked and re-stacked at the rate on your rate card.
4. Book your dock appointment
Every delivery needs an appointment booked in OpenDock. We don't accept walk-ins. Your Shipping Plan must exist before you book, because its PO number is your appointment reference.
Book at least 2 business days ahead for every delivery, freight or parcel.
Sign in to OpenDock and select the Manifest San Marcos warehouse.
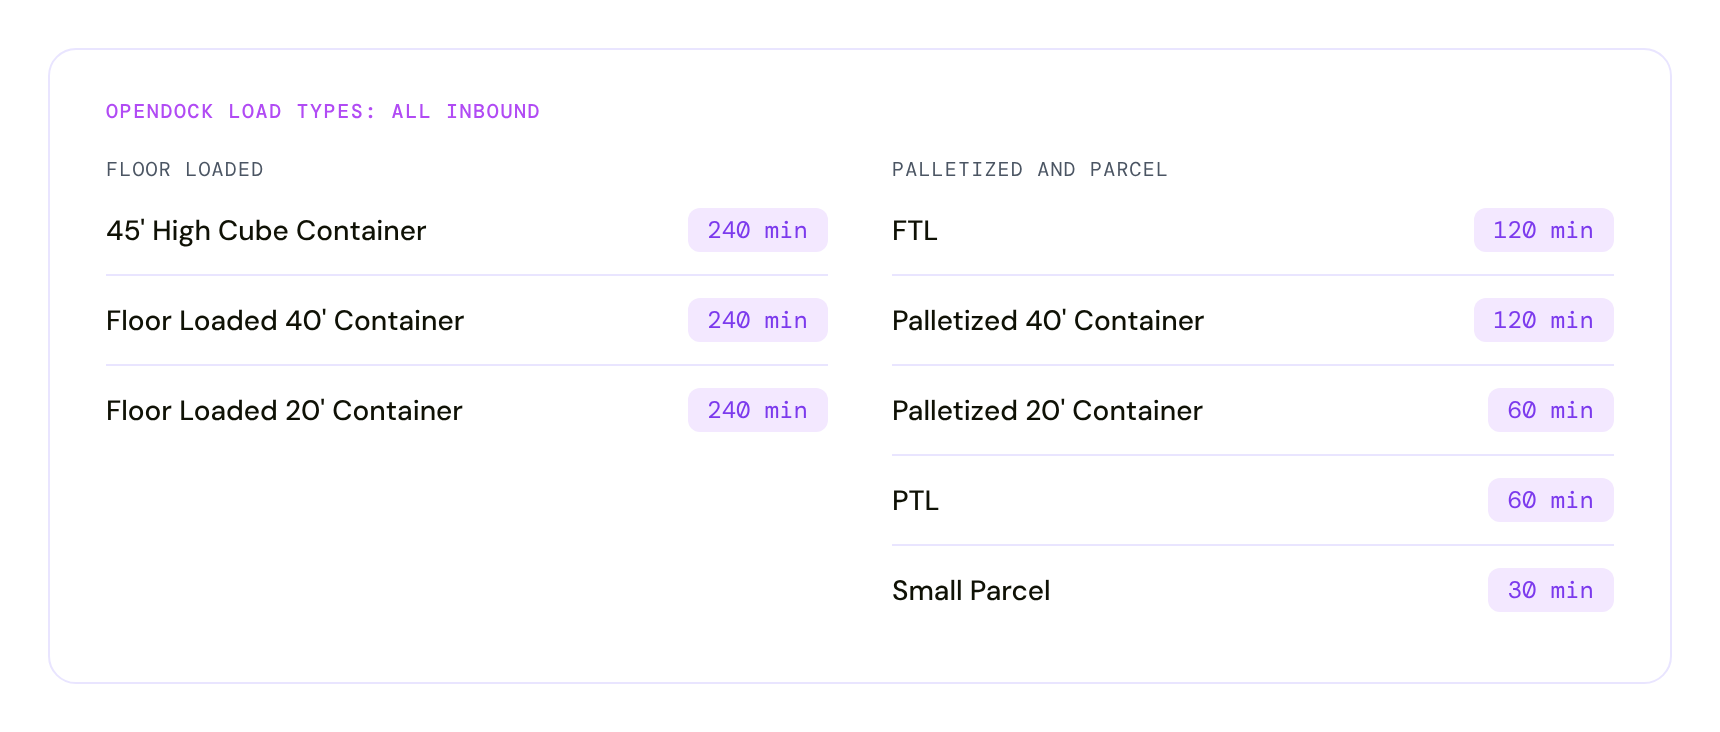
Select the load type that matches how your shipment is packed (see the table below).
Enter your Shipping Plan's PO number as the Reference Number and your brand name as the Merchant/Vendor.
Attach a copy of the BOL. This is required; without it we may not be able to identify your delivery and the carrier may be turned away.
Pick a date and time within our receiving hours and click Confirm Booking.
Make sure your shipment arrives on the scheduled date.
For the full walkthrough, including a template email for your freight forwarder, see How to Schedule an Inbound Dock Appointment Through OpenDock.
Load types
Receiving hours and address
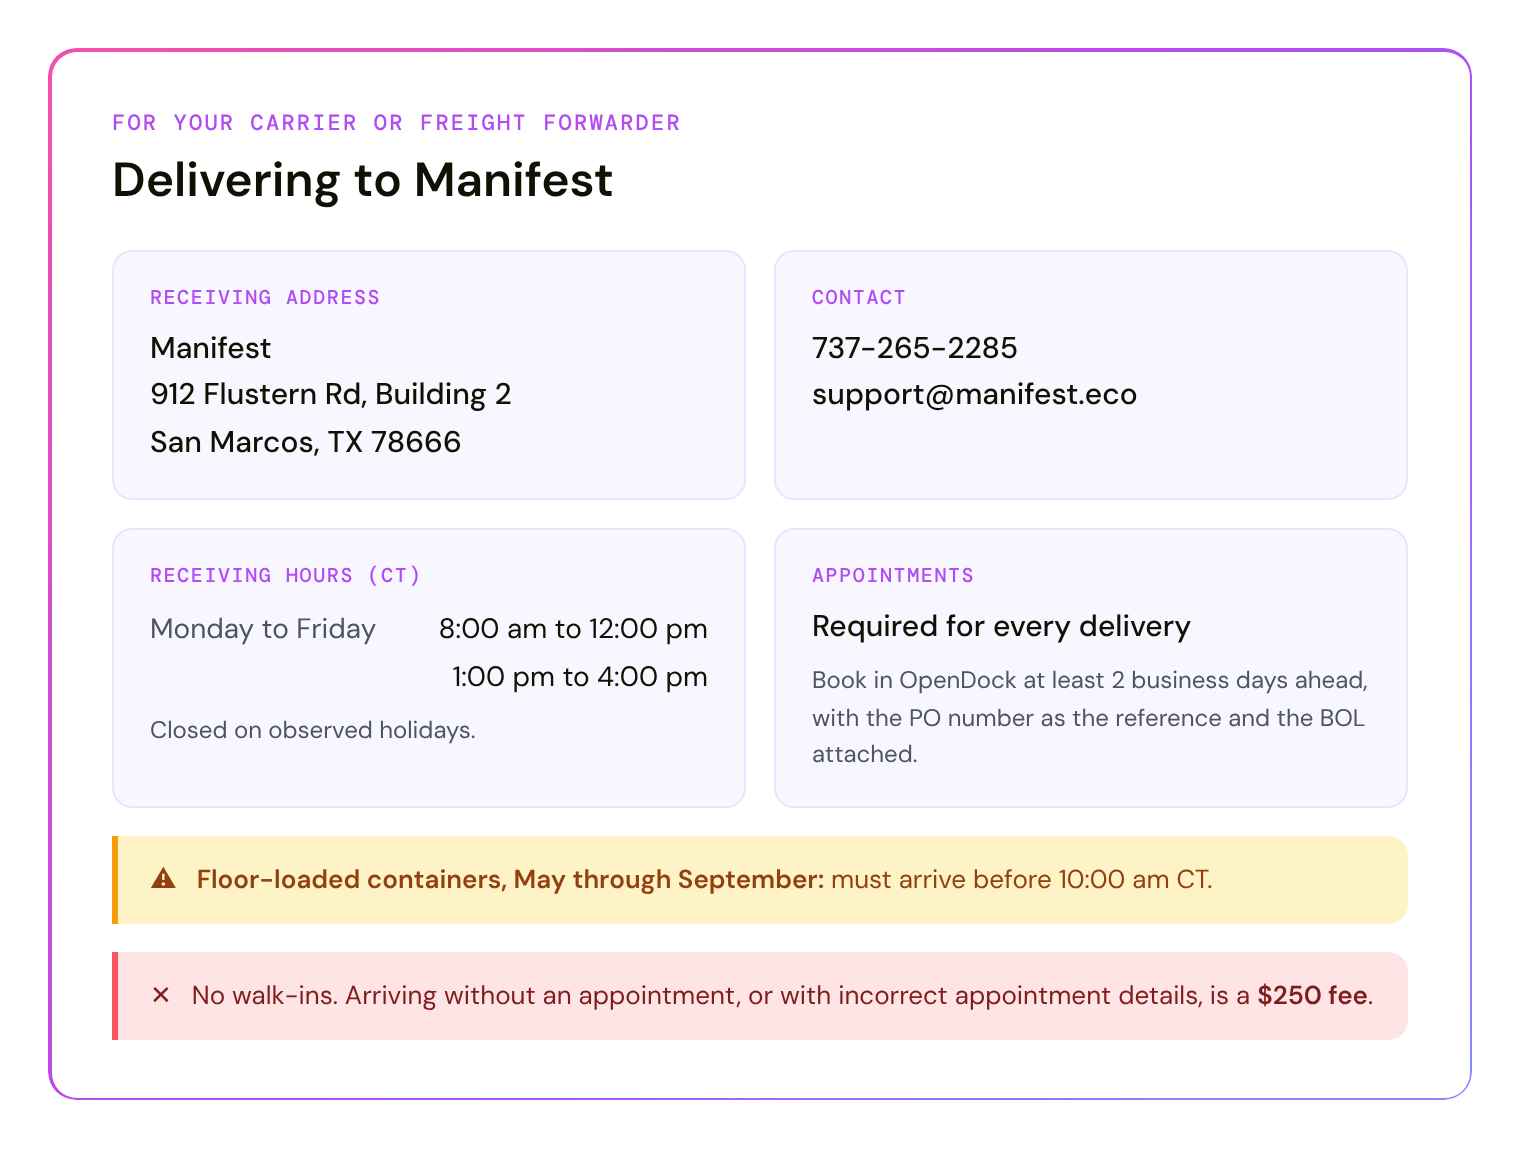
Hours: Monday to Friday, 8:00 am to 12:00 pm and 1:00 pm to 4:00 pm CT, excluding observed holidays.
Floor-loaded containers, May through September: must arrive before 10:00 am CT.
Address: 912 Flustern Rd, Building 2, San Marcos, TX 78666. See Inbound Receiving Information, Policies, and Compliance for the latest on our address change before you update your shipping documents.
Contact for your carrier or forwarder: 737-265-2285 or support@manifest.eco
Arriving without an appointment, or with incorrect appointment details, is a $250 fee plus added processing time.
Fee reference
Every one of these is avoidable by following the steps above.
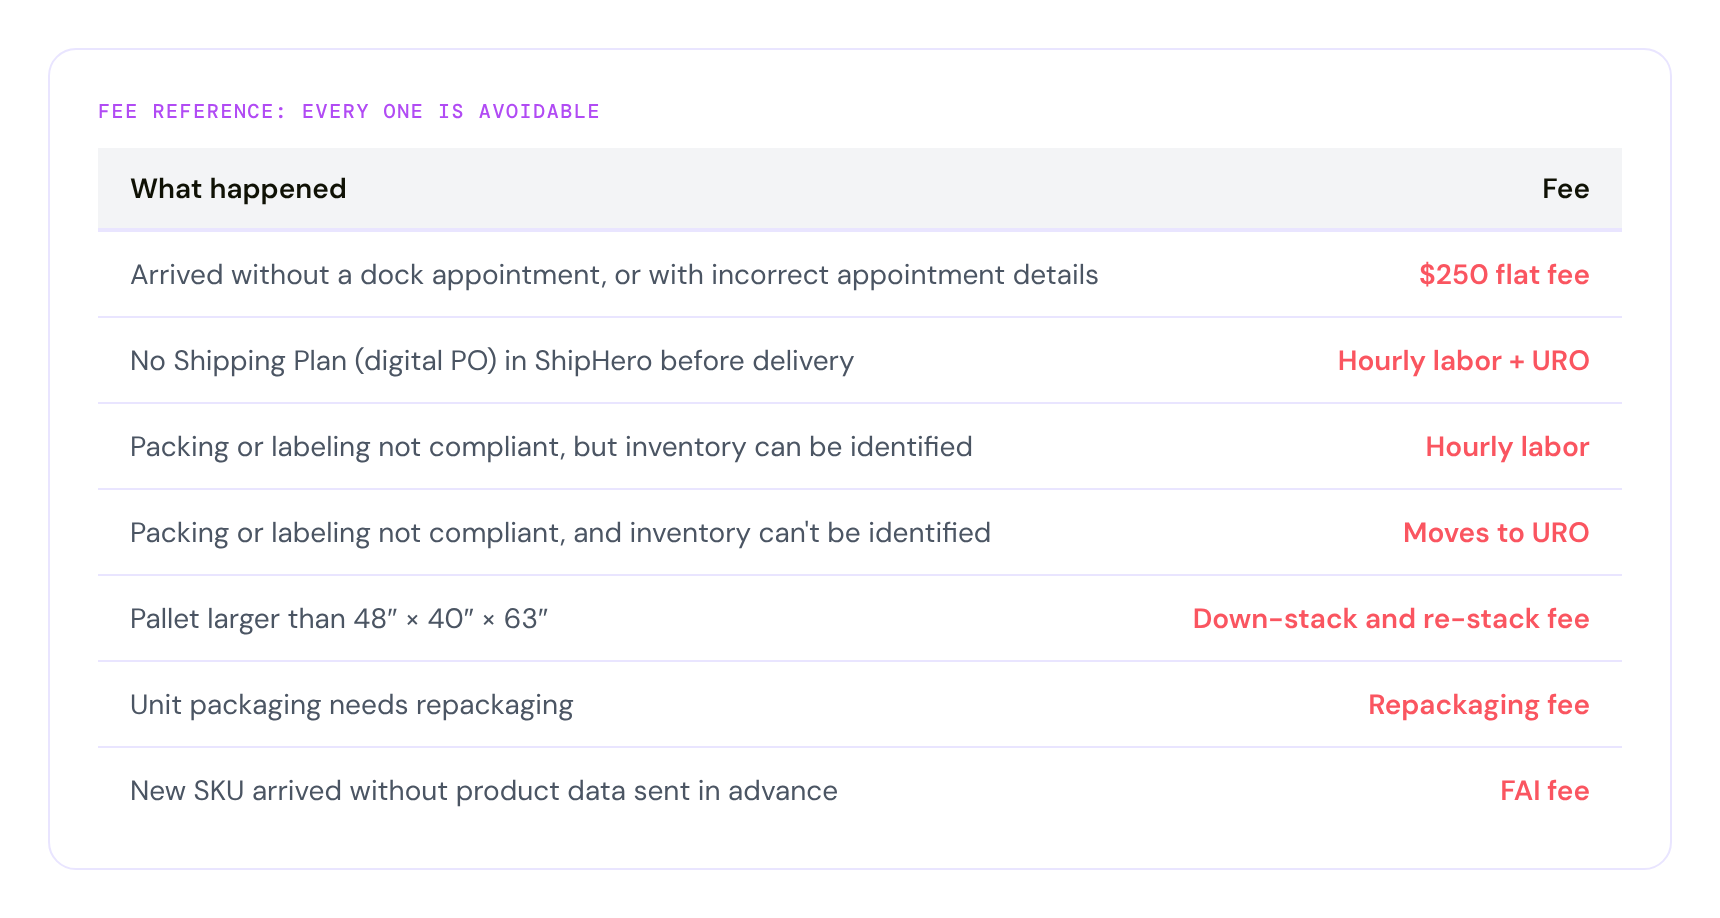
Rates are on Your Manifest Rate Card.
Pre-ship checklist
[ ] Product data CSV sent to your Account Manager for any new SKUs
[ ] Every unit barcoded and individually packaged
[ ] Shipping Plan created in the ShipHero portal
[ ] Carton labels printed and stuck on in full
[ ] Mixed SKU cartons separated and marked Parcel Mixed: Yes
[ ] Pallets are wooden 48″ × 40″, under 63″, labeled and strapped
[ ] Lot and expiration details on the cartons and sent to your Account Manager, if you track them
[ ] Dock appointment booked in OpenDock with the BOL attached
[ ] Delivery arriving on the scheduled date, within receiving hours
Things to avoid
Don't ship before your Shipping Plan exists. Without it there's nothing to receive against, so your shipment waits and moves to URO.
Don't reuse labels from an earlier PO. They point to a closed PO and can't be received.
Don't let labels peel, fold or wrap around corners. A barcode we can't scan means a manual count.
Don't change a barcode in ShipHero after it's assigned. It can't be changed; talk to your Account Manager instead.
Don't turn up without an appointment. Walk-ins are charged and may be turned away.