Loading Your Item Master and Validating Carton Dimensions
Last updated: November 3, 2026
Before Manifest can pack your first retailer order, RetailReady needs to know your products. The Item Master is your product list in RetailReady: SKUs, UPCs, case packs, and carton dimensions and weights. RetailReady uses it to match each PO line to a product, to fill in carton dimensions while we pack, and to check your cartons against each retailer's rules.
This guide covers the two Item Master items on your Brand Checklist: Upload your Item Master and Validate carton dimensions. You'll need your RetailReady login first (see Your RetailReady Account: First Login and New Brand Checklist).
Before you start
Have these ready for every product you'll ship to this retailer:
SKU and UPC. Use exactly the same SKU you use with Manifest, so orders match. SKU and UPC can't be edited later; you'd have to delete the item and add it again.
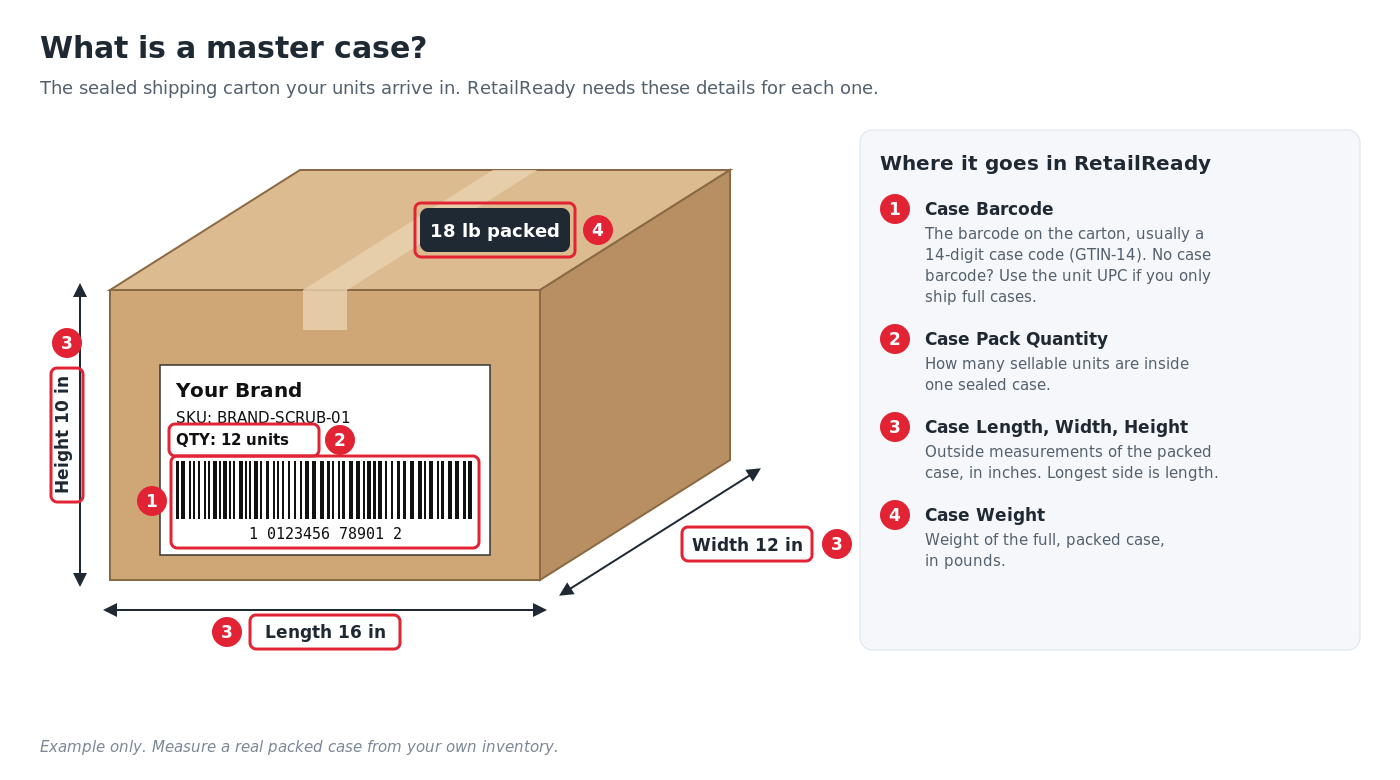
Master case: the case barcode, how many units are in a case, and the case's length, width, height (inches) and weight (pounds).
Any other case sizes the retailer might order (for example a 6-pack as well as a 12-pack).
Whether the product needs lot, expiry or serial numbers tracked, or is hazmat.
Country of origin, and your Amazon SKU if the product ships to Amazon FBA or AWD.
Measure a real packed case if you can. Wrong dimensions are the most common reason cartons get flagged.
Step 1: Open the Item Master
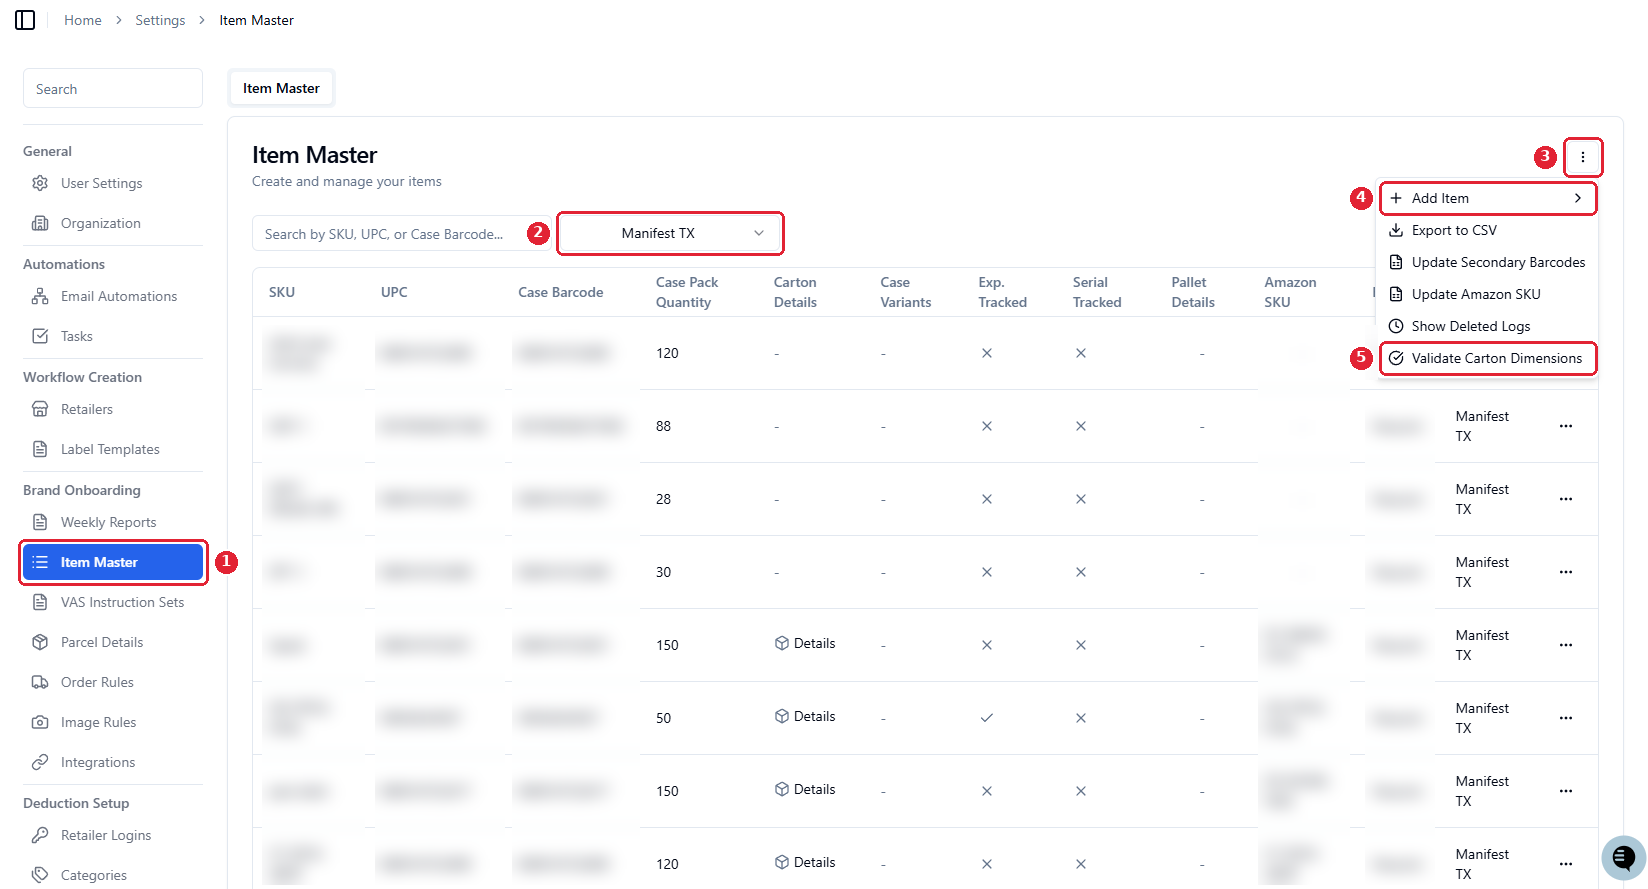
Click Settings in the bottom left, then Item Master (1).
In the facility drop-down, select Manifest TX (2).
Click the three dots in the top right (3), then Add Item (4).
Choose Single to add products one at a time, or Bulk to upload them all from a spreadsheet. Bulk is faster if you have more than a handful of SKUs.
The same menu has Validate Carton Dimensions (5), which you'll use in Step 3, and Export to CSV, which downloads your Item Master so you can check it against your own product list.
Step 2a: Add items one at a time (Single)
Product details
SKU and UPC: enter them exactly as they appear in your Manifest account.
Tracking: turn on Lot number, Expiration date or Serial number if the product needs it tracked.
Hazmat: turn on Hazmat if the product is regulated as hazardous for transport (for example aerosols, flammable liquids, lithium batteries, some cosmetics and cleaners), or Limited Quantity Hazmat if it ships under a limited quantity exception.
Retailers: every retailer starts as Included. Click any retailer that won't carry this SKU to move it to Excluded.
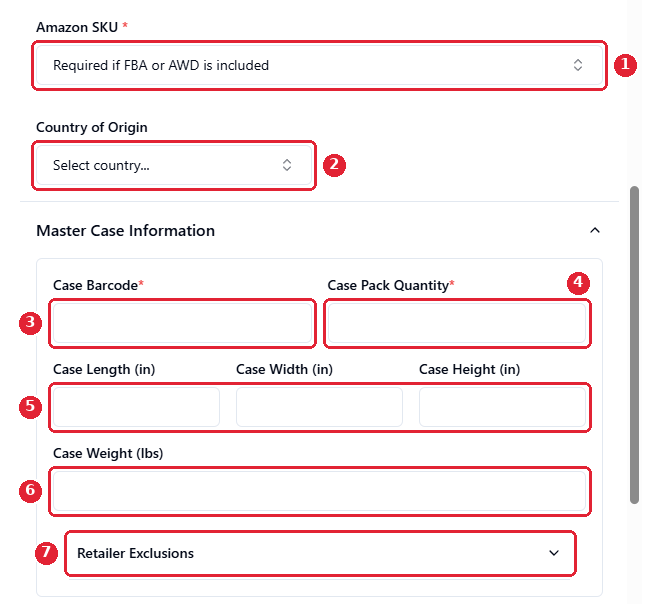
Amazon SKU (1): required only if the product ships to Amazon FBA or AWD (see Shipping to Amazon FBA Through RetailReady).
Country of Origin (2): where the product was made.
Master Case Information
Case Barcode (3) and Case Pack Quantity (4) are required. No barcode on your cases? If you only ship full case packs, enter the UPC as the case barcode.
Case Length, Width and Height in inches (5), and Case Weight in pounds (6).
Retailer Exclusions (7): open it and exclude any retailer that doesn't use this case size.
Other case sizes, pallets and barcodes
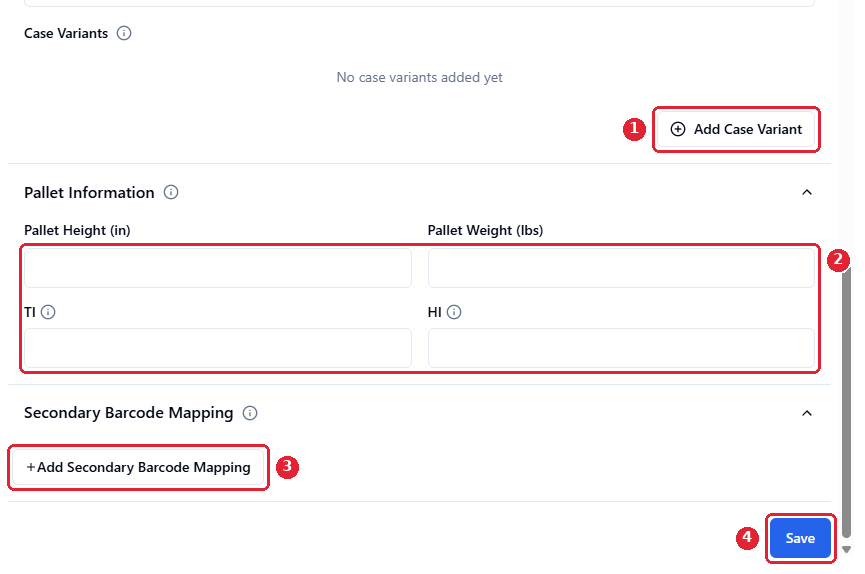
Add Case Variant (1), only if the retailer orders a different case size. For variants, retailers start as Excluded, so move the retailers that use that size to Included.
Pallet Information (2), optional: pallet height and weight, TI (cases per layer) and HI (layers per pallet), if you know them.
Add Secondary Barcode Mapping (3), optional: add retailer-specific UPCs or other barcodes for the same SKU, instead of creating a duplicate item.
Click Save (4).
Step 2b: Upload all items at once (Bulk)
Fill in RetailReady's two templates: the SKU Information Template and, if you have other case sizes, the Case Variant Template. Download each as a .csv.
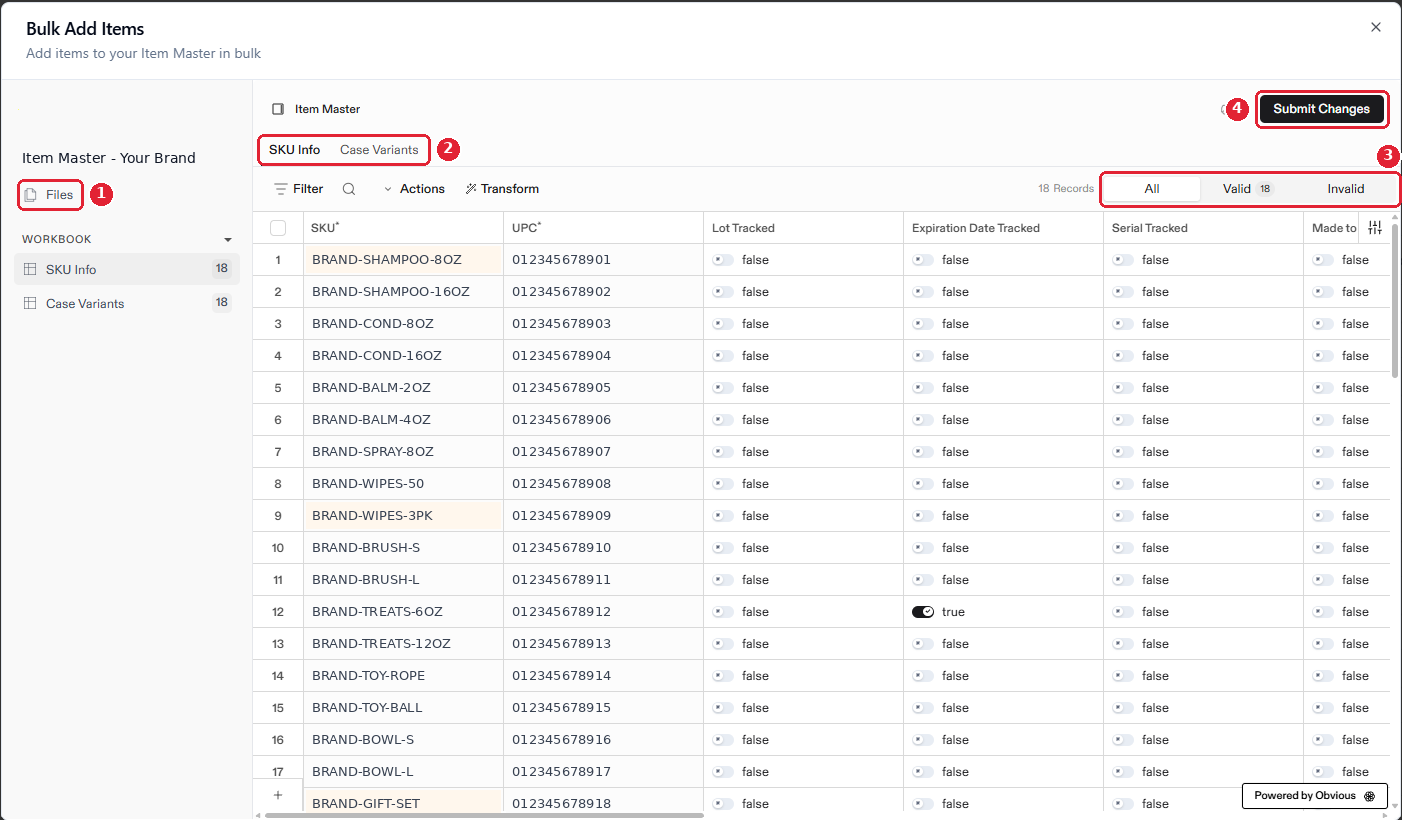
In the Item Master, click the three dots → Add Item → Bulk. The Bulk Add Items window opens.
Click Files (1) → Upload Files, choose your SKU Information file, then Import and Continue.
Check each column in your file is matched to the right Item Master column, and that the country of origin values are correct.
Review your rows on the SKU Info tab (2). Use the Valid and Invalid filter (3) to find any rows with errors, and fix them before you submit.
Repeat with your Case Variant file, if you have one. It appears on the Case Variants tab (2).
Click Submit Changes (4).
When it's done, your products appear in the Item Master list, with their Case Pack Quantity and Carton Details. To fix a product later, click the three dots on its row → Edit.
Step 3: Validate carton dimensions
RetailReady compares each case's dimensions and weight with the limits for every retailer the SKU ships to. If a carton is outside a retailer's limits and has no exemption, RetailReady blocks us from packing it, so this step needs to be clean before your first order.
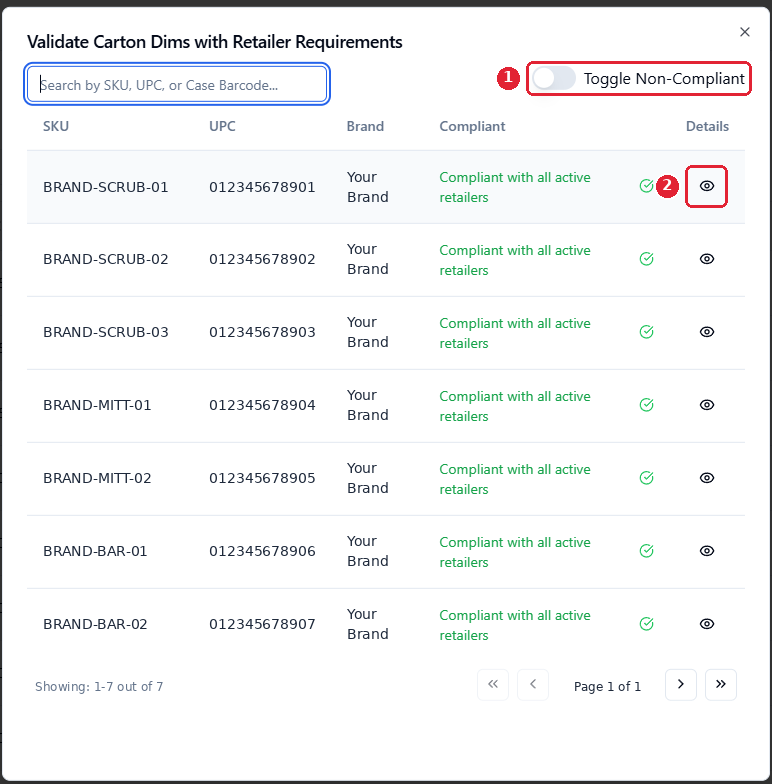
In the Item Master, click the three dots → Validate Carton Dimensions.
Turn on the toggle to show only non-compliant SKUs.
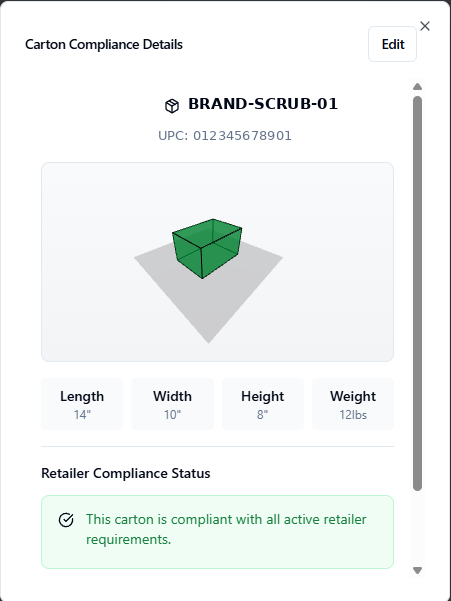
Click the eye icon next to a flagged SKU to see which retailers and which dimensions are the problem.
Then do one of these:
The dimensions were wrong: edit them right there and click Save. This updates the Item Master.
The carton is right, and the retailer has agreed to accept it: enter an exemption (below).
A size works for one retailer but not another: add a case variant for that retailer instead of changing the master case (Step 2a, item 10).
Run Validate Carton Dimensions again until nothing is flagged.
Entering a retailer exemption
Only you (the brand) can enter exemptions. Manifest can't do it for you.
Open the Retailers tab and find the retailer.
In the Carton Dimensions column, click the dash.
Tick the requirements you're exempt from, then click Save changes.
There's also a Bypass all carton validation rules option. Only use it if the retailer has confirmed in writing that it accepts these cartons; otherwise you risk chargebacks.
Check it off
When your products are loaded and nothing is flagged, check off Upload your Item Master and Validate carton dimensions in your Brand Checklist. Tell your Manifest Implementation Manager if you add new SKUs for this retailer later, so they're in the Item Master before the PO arrives.
Questions
Contact your Manifest Implementation Manager. RetailReady's own guides have more detail: How To Use Item Master and Validating Carton Dimensions and Entering Exemptions.