Your RetailReady Account: First Login and New Brand Checklist
Last updated: November 6, 2026
When you start shipping to a retailer through Manifest, your orders are packed and labeled in RetailReady, the compliance tool we use for retail and wholesale orders. You get your own RetailReady login so you can follow your orders, see carton and pallet photos, and work through your part of onboarding.
This guide covers your first login and the New Brand checklist. You only do the New Brand checklist once, for your first retailer. After that, each new retailer only has its own retailer-specific tasks.
Step 1: Log in for the first time
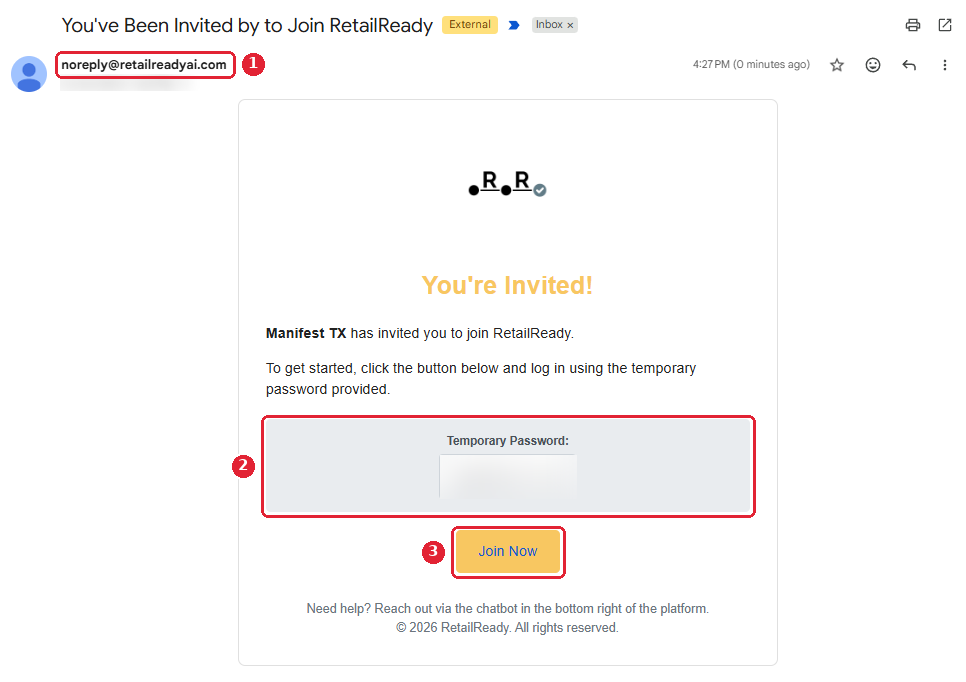
Look for an email from noreply@retailreadyai.com (1) titled You've Been Invited to Join RetailReady. It says Manifest TX has invited you. Manifest sends it to the contact you gave us in the retailer intake. If you can't find it, check your spam or junk folder.
Copy the Temporary Password (2) from the email.
Click Join Now (3) and log in with your email and the temporary password. You'll be asked to set your own password straight away.
Bookmark the login page. If the invite has expired or you can't find it, ask your Manifest Implementation Manager to resend it.
Never share your RetailReady password with anyone, including Manifest. If someone else on your team needs access, we'll set them up with their own login (Step 3).
Step 2: Find your onboarding tile
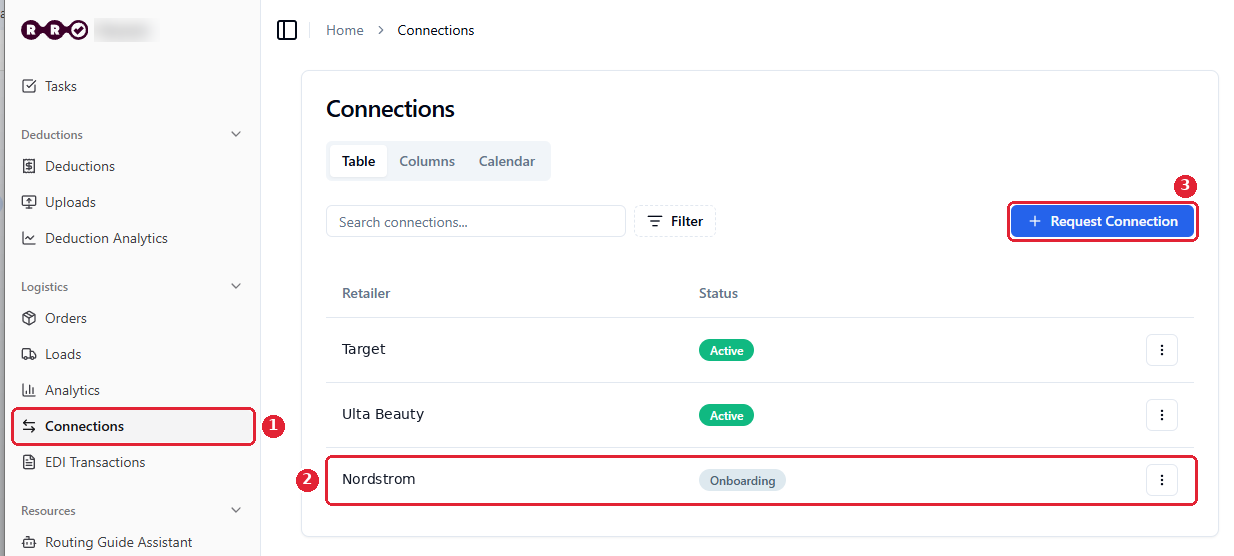
In the left menu, click Connections (1). You'll see each retailer you're connected to and its Status: Onboarding while setup is in progress, Active once it's live.
Click the retailer that shows Onboarding (2). Its onboarding tile opens. This tile is your home base during onboarding.
Inside the tile you'll see checklists for each party. Yours is the Brand Checklist. Manifest and RetailReady have their own lists, so you only need to work through yours.
You don't need to use Request Connection (3). Manifest requests every new retailer connection for you once you've filled in the retailer intake.
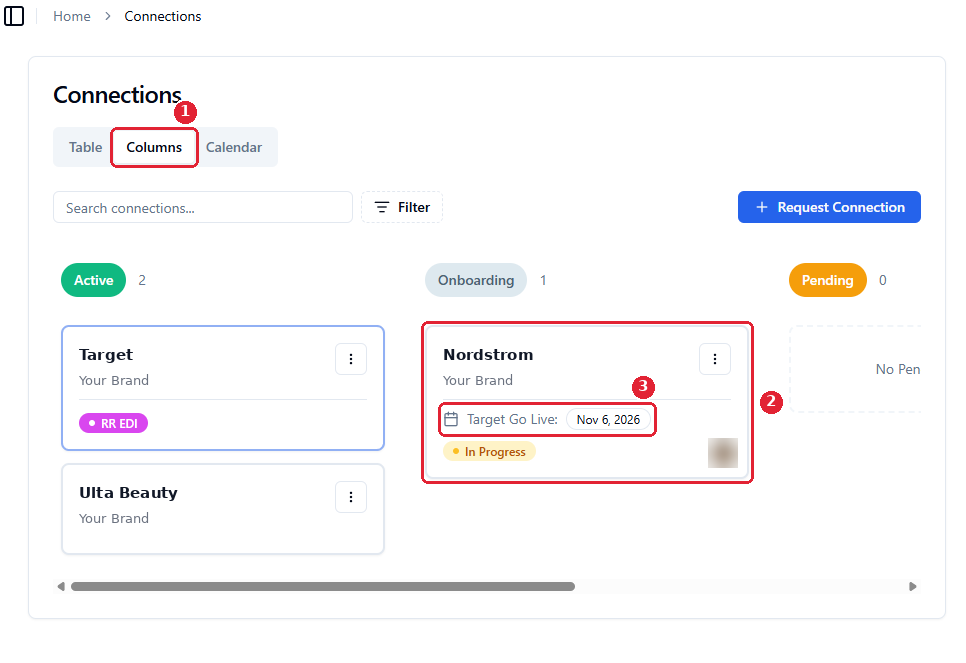
Tip: switch to Columns (1) to see your connections as cards grouped by status. The card under Onboarding (2) shows your Target Go Live date (3). Click the card to open the onboarding tile.
A few things to know about the checklist:
Check off every item, including optional ones. Checking an optional item tells everyone you've reviewed it, even if you skip it. The retailer can't go live until every item is checked.
Hover over an item to see a link to RetailReady's help article for it.
Comments in the tile are how RetailReady's onboarding specialist shares updates. You can reply there, and they usually respond within 4 business hours. For anything about Manifest, your orders or your timeline, contact your Manifest Implementation Manager.
Step 3: Complete the New Brand checklist
Expand New Brand in your Brand Checklist. It has three items.
Item | What to do |
|---|---|
Set up logins for your team | Send your Manifest Implementation Manager the name and email of each teammate who needs access. We'll create their logins, and each person gets their own invite email. Check the item off once you've sent the list, or if you're the only user. |
Upload your Item Master | Load the products you'll ship to this retailer, with case quantities, dimensions and weights. See Loading Your Item Master and Validating Carton Dimensions. |
Provide a billing contact | RetailReady doesn't invoice you directly. Manifest bills you for RetailReady, and those costs appear on your Manifest invoice. Enter the person who receives your Manifest invoices, then check the item off. |
Step 4: Review RetailReady's Onboarding 101
Also on your Brand Checklist is Review Onboarding 101. It's a short read that explains the onboarding tile, the dashboard and how updates work: Onboarding 101.
Onboarding 101 also covers requesting connections and setting up users. Manifest handles both for you, so you can skip those parts.
Optional: to get a weekly summary of comments and completed tasks every Friday, go to Settings → Weekly Reports → Configure Onboarding Report, and turn on email or Slack notifications.
What you can do in RetailReady
Your login is a brand user login. It's built for following your orders, not for packing them.
You can | Manifest handles |
|---|---|
View all your orders and their details, including the Planner view | Packing, labeling and building cartons and pallets |
See carton, pallet and document photos | Sending ASNs and shipment confirmations |
Generate compliance reports and view order logs | Creating loads and adding orders to them |
Add tags, comments and attachments to orders | Editing or cancelling orders once packing has started |
Adding, changing or removing user logins |
You can also place orders on hold, edit them or cancel them before packing starts. Please tell your Manifest Implementation Manager before you do, so we don't start work on an order you're about to change.
What's next
After the New Brand checklist, the rest of your Brand Checklist is specific to this retailer. Depending on how you connect, it can include:
Uploading Your Retailer Onboarding Files (routing guide and label examples)
Your GS1 Company Prefix: What It Is and How to Get One (if your retailer needs carton labels built from your own prefix)
Shipping to Amazon FBA Through RetailReady (Amazon FBA only)
Sending the EDI Kick-Off Email (EDI connections only)
Once orders are flowing, see Uploading Attachments to a Retailer Order if a retailer gives you shipping labels or you book your own freight.
Questions
Contact your Manifest Implementation Manager, or reply in your onboarding tile for anything specific to RetailReady.