Uploading Attachments to a Retailer Order (Including Your Own Shipping Labels)
Last updated: November 3, 2026
Some retailer orders need a file from you before Manifest can ship them, most often shipping labels the retailer gives you, or a bill of lading (BOL) for a freight pickup. You add these to the order itself in RetailReady, in the Attachments section.
You'll need your RetailReady login first (see Your RetailReady Account: First Login and New Brand Checklist).
When an order needs an attachment
File | When you'll need it |
|---|---|
Parcel shipping labels | The retailer creates the labels itself, in its own portal (for example Target's ShipIQ) or by sending you carrier labels. See If you supply the shipping labels below. |
Bill of lading (BOL) | You book the freight pickup yourself. Add the BOL to every order on that pickup (see How to Facilitate Freight Pickup in RetailReady). For Amazon FBA shipments with your own carrier, see Shipping to Amazon FBA Through RetailReady. |
Other retailer documents | Anything the retailer requires to travel with the order, such as a retailer-specific packing list. |
If Manifest prints the labels in RetailReady, you don't need to upload anything.
How to upload an attachment
Click Orders in the left menu, select Table, and search for the order number.
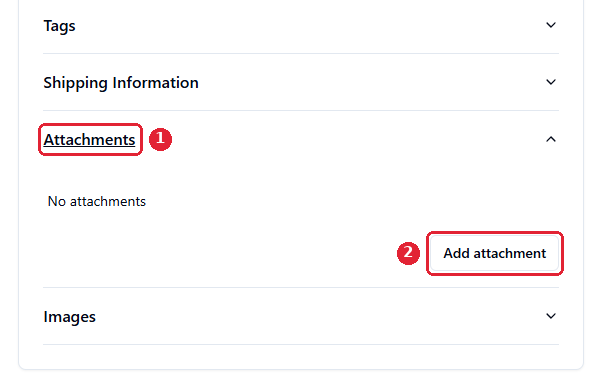
Open the order and scroll down to Attachments (1). Click it to expand it if it's closed.
Click Add attachment (2) and choose your file.
Let your Manifest team know, with the PO number, in your Slack channel or by email.
PDFs work best. Name the file with the PO number and what it is, for example PO-1234567-labels.pdf or PO-1234567-BOL.pdf.
If you supply the shipping labels
How it works
We pack the order. The carton count, dimensions and weights appear on the order's Cartons tab.
You create the labels in the retailer's portal, using that carton count, and the dimensions and weights.
You set the order to external labels (Step 1) and upload the label file (Steps 2 and 3).
You add tracking numbers to each carton, if the retailer requires it (Step 4).
We apply the labels and ship. RetailReady sends the ASN to the retailer once the order is loaded.
The order can't ship until the labels are uploaded, so upload them as soon as you have them.
Step 1: Set the order to external labels
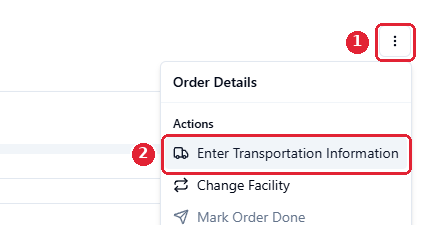
Open the order and click the three-dot menu (1) in the top right.
Select Enter Transportation Information (2).
Set Method to Parcel (1).
Set Parcel Label Generated By to External (2).
Fill in the shipment details from the retailer's portal or the carrier:
Parcel Tracking Number (3): for multi-carton orders, use the first carton's number, and add the rest per carton in Step 4.
Carrier Name (4): type the carrier, for example UPS or FedEx.
Carrier Alpha Code (SCAC) (5): the carrier's 4-letter code, for example UPSN for UPS.
Carrier Trans Method Code (6): search and pick the code. The options are set by the retailer.
Current Scheduled Delivery Date (7): if the portal doesn't give one, enter your best estimate.
Click Save (8).
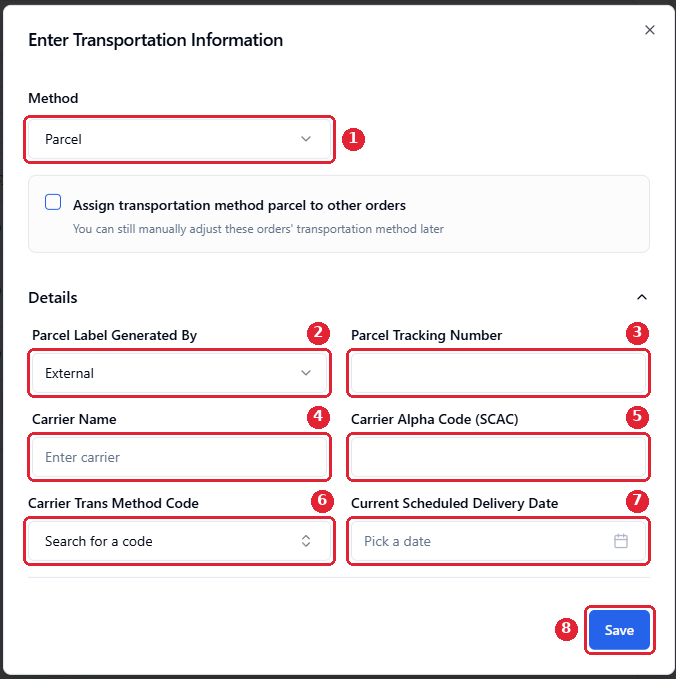
Shipping several orders the same way? Tick Assign transportation method parcel to other orders to apply the method to other eligible orders. You can still change each order's method later.
Step 2: Set up your label file
Getting the file right is what lets us label every carton correctly the first time.
One PDF per order. Don't combine labels for different POs in one file.
One label per carton. The number of labels should match the carton count on the order's Cartons tab.
One label per page, 4 x 6 inches. Don't send letter-size pages with several labels on each.
Labels in carton order. If the labels say "1 of 5", "2 of 5" and so on, keep them in that order.
Name the file with the PO number, for example PO-1234567-labels.pdf.
Match the ship-to. Check that every label's ship-to address and DC match the order in RetailReady.
If the retailer changes the order after you've created labels, delete the old file from the order before uploading the new one, and let us know.
Step 3: Upload the label file
Upload it to the order's Attachments section with Add attachment, as in How to upload an attachment above.
Step 4: Add tracking numbers to each carton (if required)
Some retailers (for example Zappos) need a tracking number on every carton in the ASN. RetailReady can't read tracking numbers from the label PDF, so they need to be entered by hand.
Open the order and go to the Cartons tab.
On each carton, find Parcel Tracking Number, click Click to edit, and paste the tracking number from that carton's label.
Click Save, and repeat for every carton.
Tracking numbers have to be entered one carton at a time. If you enter one wrong, you can edit it at any point before the ASN goes out.
Questions
Contact your Manifest Implementation Manager. RetailReady's own guides have more detail: Transportation Information for Parcel and How to Add a Tracking Number to a Carton.